How to add a logo
This page describes how to add a logo to a media file using the VLC Media Player.
Using the GUI
To add a logo to a video file, follow these steps:
Open the video in VLC Media Player.
Go to . (Ctrl + E)
Select the tab.
Select the tab.
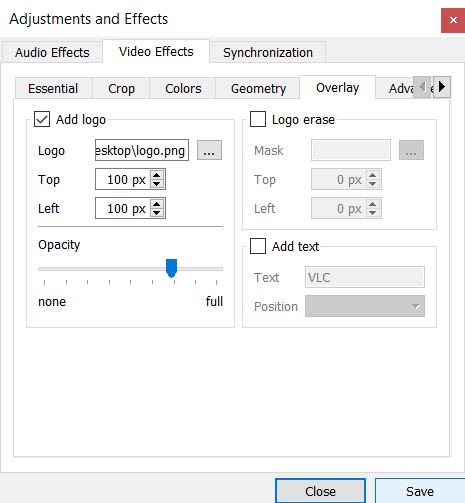
Check the Add logo radio button.
Click on the “…” button beside the Logo textbox.
Navigate and Select the image that you wish to use as the logo.
Adjust the position of the logo by changing the Top and Left offsets.
Adjust the opacity of the logo by moving the Opacity slider.
Click on the Save button to save the changes.

The Overlay tab under the Video Effects section.
Using the CLI
There are three ways of adding a logo to a video using the CLI:
Using the logo sub-soure option.
Using the logo video-filter.
Using the logo sfilter while transcoding.
The first two methods add the logo on the video at the run time, while the third one can be used to save or stream the video file with the logo embedded in it.
In all the three methods, the properties of the logo (like opacity, position, offset, etc.) can be set by using the options mentioned at the end of this page.
Set up the terminal by following these steps:
Open the terminal.
Navigate to the directory where the required files are present (otherwise, will need to add the path of the files when running the command).
Run either of the three commands mentioned below, while altering the command as per the OS based on How to run VLC through the CLI.
Using the logo sub-source option
Suppose we wish to display the logo logo.png on the file sample.mp4.
Using the logo sub-source option, we can do that by running the following code:
$ vlc --sub-source logo --logo-file logo.png sample.mp4
Using the logo video-filter
The command to add the logo using the logo video-filter is as follows:
$ vlc --video-filter logo --logo-file logo.png sample.mp4
When the logo video-filter is used, the logo can be moved around with the mouse while the video is running.
Using the logo sfilter while Transcoding
This method uses transcoding. You can refer to Introduction to Transcoding and How to Transcode a file if you want to know more about transcoding.
When we are transcoding a file, we can both save the final output or stream it with the logo in it. The command when saving the transcoded output file would look like the following:
$ vlc --logo-file logo.png sample.mp4 --sout="#transcode{vcodec=h265, acodec=mp4a, sfilter=logo}:std{access=file, mux=ts, dst=sample_with_logo.mp4}
Note: It is important to specify the relevant codecs and muxer even if the final video uses the same codecs and containers as the original one.
Additional Options
In all the above three cases, the options mentioned below can be suffixed to the command to change the properties of the logo:
Name |
Type |
Explanation |
Accepted values |
Default Value |
|---|---|---|---|---|
logo-file |
string |
The path of the file(s) to display (optionally, along with the duration and opacity). |
– |
– |
logo-opacity |
integer |
The opacity of the logo. |
0 (transparent) to 255 (opaque) |
255 |
logo-position |
integer |
Specifies the position of the logo. |
0, 1, 2, 4, 8, 5, 6, 8, 10 |
5 |
logo-x |
integer |
The left-offset for the logo. |
– |
0 |
logo-y |
integer |
The top-offset for the logo. |
– |
0 |
logo-delay |
integer |
The time in ms for which every image in the loop will be displayed. |
– |
1000 |
logo-repeat |
integer |
Number of loops for the logo animation. |
-1 (continuous) and 0 (disable) |
-1 |
Note 1: logo-delay will be used for images whose duration is not specified in the logo-file option.
Note 2: For logo-position, the values correspond to the following positions:
Number |
Position |
|---|---|
0 |
Center |
1 |
Left |
2 |
Right |
4 |
Top |
8 |
Bottom |
5 (1+4) |
Top-Left |
6 (2+4) |
Top-Right |
9 (1+8) |
Bottom-Left |
10 (2+8) |
Bottom-Right |
Examples
Eg 1: To run “sample.mp4” file with three logos on loop, where “logo.png” is on screen for three seconds at 50% opacity, “logo2.png” is on screen for four seconds at 25% opacity, followed by “logo3.png” on screen for five second at 100% opacity, we can run the following code:
$ vlc --video-filter logo --logo-file "logo.png,3000,128;logo2.png,4000,64;logo3.png,5000" sample.mp4
Eg 2: To save sample.mp4 file with logo.png as the logo at the bottom-right corner at 25% opacity, run the follwoing command:
$ vlc --logo-file logo.png sample.mp4 --sout="#transcode{vcodec=mpgv, acodec=mp4a, sfilter=logo}:std{access=file, mux=ts, dst=output.mp4}" --logo-opacity 64 --logo-position 10
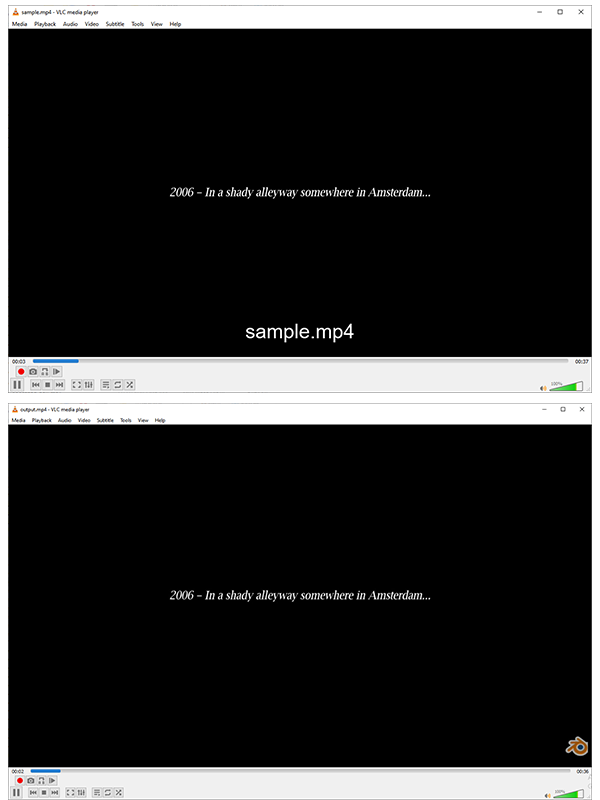
For reference, following are the snapshots of a video file. The first one is without the logo, while the second one is with the logo at the bottom right corner.

Video Credits: Blender. Notice their logo in the bottom right corner.