Screen Recording
This page explains how to use VLC for recording the screen.
We will use screen:// while opening VLC from the terminal to capture raw frames for the screen recording. However, that alone will not be enough as we will need to process those raw frames and then save/stream the final output.
As the sout chain works as a pipeline, we can break the process in the following four steps:
Use
screen://to capture raw frames.Encode the raw frames using the
vcodecparameter of thetranscodemodule.Mux the encoded stream using the
muxparameter of thestdmodule.Save or stream the muxed stream at the required destination using the
accessanddstparameters of thestdmodule respectively.
As a pre-requisite, refer to How to transcode and save the file to understand how to do basic transcoding.
For screen recording, you can choose the relevant vcodec and mux as per your need, but make sure that they are compatible with each other. To set the rate at which the recording will be done, assign the required frame rate to the screen-fps option, like in the examples below.
How to record and save the file locally?
To record the screen and save it locally, run the following command on the terminal:
$ vlc screen:// --screen-fps=25 --sout="#transcode{vcodec=mp4v}:std{mux=mkv, access=file, dst=output.mkv}"
Running this command will open a VLC window and start the recording.
To stop it, press the stop icon in the bottom left region of the VLC window. As soon as the recording is stopped, the output file will be saved at the path specifed in the dst parameter. (In case no path is specified, like in the code above, the recording is saved in the directory from where the code was executed.)
How to live stream the screen recording?
As it can be noticed in the flow chart at the start of this page, the decision to save or stream is the last step of the process. Hence, we will only need to make the changes there while the rest of the process remains the same.
For this example, we will stream the recording over the local network using HTTP. Refer to the Stream over HTTP for information about streaming a simple file over HTTP, as that is a pre-requisite for this.
It is important to remember that streaming over the “local” network means that the streaming and the receiving device(s) need to be connected to the same router for the streaming to work.
In case of streaming over HTTP, we need the following information:
Know the IP address of the streaming device.
Decide a port number and path name where the streaming will be done.
For the following example, let’s assume that the IP address of the streaming device is 192.168.0.101, and let’s choose to stream at port number 8090 and path name stream (you can choose your own port number and path name).
Sending the recording from the streaming device
Run the following code on the device whose screen-recording is to be streamed:
$ vlc screen:// --screen-fps=25 --sout="#transcode{vcodec=mp4v}:std{access=http, mux=mkv, dst=:8090/stream}"
Receive the screen recording on the receiving device
To receive the screen-recording, run the following code on the receiving device(s):
$ vlc http://192.168.0.101:8090/stream
Diagramatically, this is how it might look in the network:
Additional information regarding streaming
You can also stream the screen-recording over UDP, RTP, and RTSP by modifying the code accordingly. Head over to the Stream over the Network section for exploring how to stream files over different protocols.
If you are a teacher who wishes to share their screen with the entire class, it might be useful to use SAP announcements as well, as they help receiving devices to connect to the stream without manually setting the IP address or running any code.
You can run the following command to multicast stream the recording over UDP with SAP announcements:
$ vlc screen:// --screen-fps=25 --sout="#transcode{vcodec=mp4v}:std{access=udp,mux=ts,dst=239.255.255.250,sap,name=screen}"
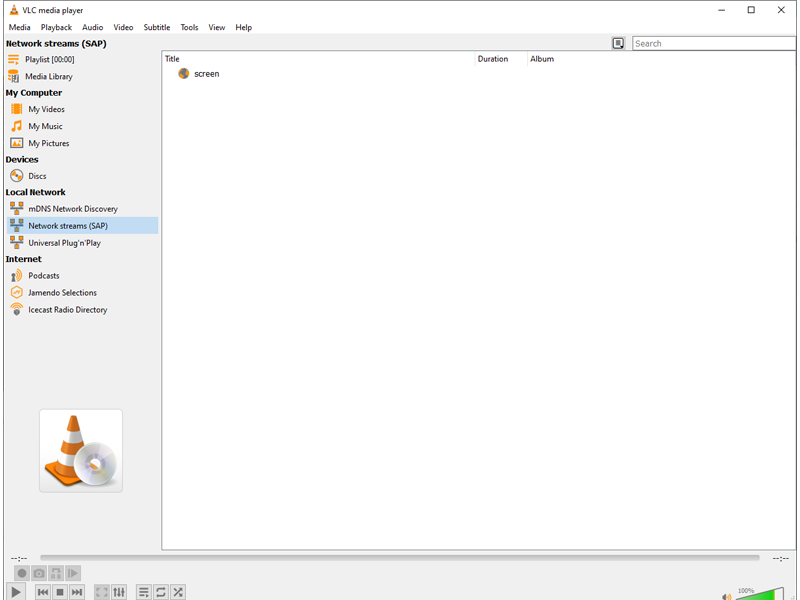
On the receiving device(s), the students can simply open VLC, go to , and click on Network Stream (SAP) in the “Local Network” section on the left side.
They will see the SAP announcement named screen like in the following figure:

The receiver(s) can double click on the screen stream to start receiving the stream.
Automate the process of streaming the screen recording
You can use the Video Lan Manager (VLM) for storing the settings and configuration. This way, you will be able to start sharing your screen without having to write the entire sout chain everytime.
Refer to VLM Introduction to understand how to execute .vlm files, and refer to Screen Share using VLM to see how to automate the process of sharing your screen using a VLM file.